Nostalgia Retro Cocktail Party

Happy Days Are Here Again!

zhee retro recipeSo I am in my early forties and finding myself feeling nostalgic and reminiscing with my friends (many of which have been with me since elementary school) much more often these days. I mean isn’t that what we do at this age – talk about “back in the day” and laugh together till wee hours in the night?

The other night we were reminiscing about one of my favorite TV shows from “back in the day”, Happy Days. For those of you too young to have seen it, it was a family comedy that took place in the 50’s with great music and teenage romance and all that good stuff.  This got me to scheming about my next themed party.  

My people are always game for a party that involves yummy food and drink, but especially one that involves dressing in costume. So, I am getting motivated to plan a Nostalgia Retro Cocktail Party, including all of the retro cocktails, 50’s dress up and music, followed by outdoor all night viewing of the DVD set of Happy Days episodes.

cocktail partyThe cuisine from the 50’s wasn’t exactly health conscious, and so much of it included oddly shaped and formed bits of convenience meats and cheeses.  This was the time, mind you, when TV dinners, spam and processed cheese “food” were running rampant in the kitchens of house wives all over America. Meat loaf, deviled eggs, tater tots, molded jello desserts and cheese logs were on the menu for most dinner parties.  

So, I am going to do my best to honor these time tested menu items at my party.  But of course, in true Flavor Conspiracy style, I will be creating slightly more healthful versions of the classics; using fresh natural ingredients and sneaking in more of my favorite super foods.

On the menu:

  • Coconut Mango Jello Shots – From scratch, using fresh fruit, lite coconut milk and coconut sugar in place of refined white sugar.
  • Deviled Eggs – chock full of minced homemade pickles, swap in Greek yogurt in place of mayo, topped with crispy prosciutto and chives
  • Tater Tots – with added cauliflower and parsnip in the mix
  • Mini Meatloaves – my turkey meatballs with tons of veggies, fresh herbs and oats instead of bread crumbs
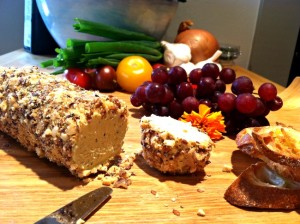
  • Cheese Logs – swapped out the processed cheese product and use low-fat cream cheese with sharp cheddar, feta and a toasted nut and flax seed crust

I can’t wait to get this party started!!! So I have already started playing around with my recipes.  Below are two that I will share as a teaser.  After I have the party, I will post pics of the final shindig.

Zhee Zhee’s Turkey Meatballs (a.k.a. Mini Meatloaves)
Yields 30
Mini Meatloaves with tons of veggies, fresh herbs and oats instead of bread crumbs.
Write a review
Print
Prep Time
15 min
Cook Time
15 min
Total Time
30 min
Prep Time
15 min
Cook Time
15 min
Total Time
30 min
Ingredients
  1. 1 pound ground turkey
  2. 3 cloves garlic, minced
  3. 1 c. small diced onion
  4. 1 c. each grated zucchini and carrot
  5. 1 c. rolled oats
  6. 1 egg white
  7. 1 TB each tamari, balsamic, Worcestershire sauce
  8. 1 tsp. kosher salt
  9. 1 tsp. dried oregano
  10. 2 tsp. each minced fresh oregano and thyme
  11. Chili flakes
Instructions
  1. Meatballs - In a sauté pan, caramelize onions and carrots, then stir in zucchini and garlic. Cook for 1 more minute, and transfer to a bowl with remaining ingredients.
  2. Form mixture into balls (about 1 TB each). Place them on a sheet pan lined with greased foil, about an inch apart. Bake at 425 degrees until browned…15 minutes. If you are making mini meat loaves, divide mixture into greased muffin tin and bake for 20-25 minutes.
  3. To serve - Ladle some of your favorite warm marinara on the bottom of the platter, then place the meatballs down and sprinkle with scallions (and it may sound strange, but I love to also sprinkle with chopped cashews or pine nuts).
Notes
  1. I sometimes just make a very quick fresh tomato sauce: Sauté 1 c. onion and 3 cloves garlic in 2 TB olive oil, until very caramelized (about 6 minutes). Stir in ¼ c. red wine and 1 TB balsamic with 1 tsp. kosher salt and ½ tsp. chili flakes. When liquid is almost evaporated add 3 cups diced roma tomatoes and cook until the tomatoes start to melt. Puree in a blender with a couple pinches of dry basil and a couple of fresh basil leaves.
The Flavor Conspiracy http://flavorconspiracy.com/


Retro Cheese Log Makeover
Yields 2
I'm swapping out the processed cheese product and use low-fat cream cheese with sharp cheddar, feta and a toasted nut and flax seed crust.
Write a review
Print
Prep Time
15 min
Cook Time
20 min
Total Time
35 min
Prep Time
15 min
Cook Time
20 min
Total Time
35 min
Ingredients
  1. 8 oz. Neufchatel (1/3 less fat cream cheese)
  2. 4 oz. feta cheese
  3. 8 oz. shredded sharp cheddar
  4. 1 TB plain nonfat yogurt
  5. 1 tsp. fresh thyme leaves
  6. 4 TB fresh Italian parsley leaves
  7. 2 cloves garlic
  8. 1 TB Worcestershire sauce
  9. 1 tsp. kosher salt
Coating Ingredients
  1. 1/2 c. walnut pieces, toasted
  2. 1/2 c. almond slivers, toasted
  3. 3 TB flax seeds
  4. 1 TB minced rosemary
  5. 1 tsp. each kosher salt, black pepper and smoked paprika
Instructions
  1. Place coating ingredients in a food processor, and pulse until the nuts are very finely chopped. Transfer to a large plate and set aside.
  2. Add thyme, parsley, cheddar and garlic to the food processor. Process until it is all finely combined. Add remaining ingredients, except for the coating. Turn the machine back on and let it puree until everything is totally smooth.
  3. Divide the cheese mixture evenly between two pieces of plastic wrap (about 12”x 12”)…form the cheese mixture into logs, approximately 7 inches long and maybe 2 inches in diameter. Use the plastic wrap to form the logs evenly and twist the wrap on the ends. Chill it for 20 minutes in the fridge.
  4. Carefully unwrap the cheese logs and roll each one in the coating, so that they have an even layer of toasted nuts and seeds. Make sure to press the nuts into the logs, so that the layer is quite thick, as well. Serve on a platter with crackers or crostini.
Notes
  1. Alternative, which I almost prefer, is to form the cheese mixture into individual truffle sized balls, then chill and coat with nuts. You can serve individual cheese balls on a small bed of arugula salad with bread sticks or elongated crouton of rustic bread.
The Flavor Conspiracy http://flavorconspiracy.com/


Non-Pizza Pizza

Welcome to Zhee Zhee’s non-pizza pizzeria!

It’s non-pizza because I don’t follow any traditional pizza making process, I don’t let the dough rise but for a couple minutes, I don’t make it in a round pizza shape.

RECIPE INCLUDED BELOW.

What I do is throw together a quick yeast dough (recipe to follow) and stretch it into individual sized long oval type shapes. I top it with whatever the heck I want to. The cheese I use will just be whatever I feel like, generally it won’t be anything like the typical mozzarella, ricotta or parmesan. I love those cheeses and use them for all sorts of stuff…but being the multi-cultural girl with a love for variety you will rarely find me following the classics. So I highly suggest you stray from the classics, as well.

Hey live life on the edge and stop shopping for recipes. Instead use a recipe as a general idea and guideline for technique. Other than that make use of what you have, what’s in season, what you found on sale, etc.

Any vegetables or bits of meat can be sautéed with some minced garlic in some coconut oil or olive oil for a few minutes; then tossed with a splash of vinegar and some fresh herbs. This time around I had some mushrooms and fresh oregano. The cheese that was in my fridge was some yummy nutty Spanish Manchego.

In the photos and recipe below, I show you the ingredients I prepped and laid out to make it really easy for me to assemble this funky quick non-pizza, plus I share with you just how I did it.

Non-Pizza Pizza
Write a review
Print
Ingredients
  1. 1 lb. mushrooms, sliced thin
  2. 2 cloves garlic, minced
  3. About 2 TB fresh oregano leaves
  4. ½ tsp. each chili flakes, black pepper, cayenne and kosher salt
  5. 2 tsp. each tamari and balsamic vinegar
  6. Handful of roasted cashews- Yes, that’s right I put nuts on pretty much everything!
  7. Handful of Manchego cheese
  8. Heaping tsp. organic coconut oil
  9. 1 batch of pizza dough
Instructions
  1. I heated a large sauté pan and tossed in the coconut oil. When that was melted and the pan began to smoke, I added the mushrooms with the salt and pepper variety. I sautéed them on high heat until the mushroom juices emerged and then began to evaporate again.
  2. Next the garlic and fresh oregano went in. I didn’t bother chopping the oregano, just tore it with my hands. Kept cooking until the juices totally evaporated and the mushrooms started to get kinda sticky to the pan and brown.
  3. In went the tamari and balsamic…and tada! It’s ready to be a pizza topping! I grated the Manchego using one of my favorite tools of all time…the Microplane. It is this wonderfully sharp (as in careful cause you don’t know pain until you have grated your knuckles with one of these suckers) and it grates stuff to a fine delicate fluffy shred. **Look for my list of “gotta haves” for details coming to the blog bit soon.
  4. Stretch the dough out into thin weird little ovals. Drizzle and rub with olive oil. Spread with some of the mushroom mixture and then top with cheese and roughly chopped roasted cashews.
  5. Another totally non-traditional technique I love to use for my little non-pizzas is foil. It is thin enough that you can get a good crispy edge and you can shape it however you want to. Especially since…yep you betcha, I am baking these little guys in a toaster oven. Don’t even get me started about how much I love my toaster oven…all the glory of a convection oven, without heating the whole house. Its big enough to cook 3 to 6 portions of pretty much anything (roasted chicken, veggies, brownies, lasagna). Crap, I wasn’t going to get started on that, was I? Oh well. A good sized toaster oven is the bomb, and let’s just leave it at that.
  6. High temp for me is better, faster, and crispier. Just make sure your dough was stretched thinly. 425-450 degrees is my temp of choice for most things. Um, mine cooked in about 15 minutes.
  7. And voila, there you have my Mushroom and Manchego Pizza with Cashews and Fresh Oregano…but it’s not pizza, but it is, but not really. Who really gives a crap, it’s delicious!
Notes
  1. BONUS - Bonus: My super quick pizza dough recipe that I use for flatbread, pizza and let it rise an extra hour for focaccia. In one big bowl combine 2 c. flour, 1 tsp. salt, ½ tsp. pepper. In a little bowl on the side combine 2 ¼ tsp. yeast, 1 tsp. sugar and ½ c. very warm water. Let the water and yeast sit for a few minutes, then add 2 TB olive oil and combine both bowls. Mix it together and add a bit more water or flour if needed. Knead the dough for a minute. Then cover with a damp towel and let the dough rise for just 15 minutes in a warm area. It is now ready for you to use however you want to. Just remember that when rolling or stretching, it helps to have a little flour on the side to keep your hands from getting sticky.
The Flavor Conspiracy http://flavorconspiracy.com/


Pop-Up Cooking School in San Diego

Zhee Zhee’s Pop-Up Cooking School is a new addition to my offerings.

(Next Pop-Up Cooking School is March 29th at Liberty Station.)

I love this gorgeous city of ours and really love spending time in many of our outdoor parks.  Cooking outside and feeding people are two of my favorite things ever!  So I had the idea of packing up my camp stove and holding demonstration style cooking classes out in the open. Each time holding these classes in a park or beach (or hey someone’s awesome back yard??).  It gets local food enthusiasts learning, exploring and sharing…while they dine on a freshly made four- course meal. 

My way of summing it up is: “You bring an empty stomach, a chair, picnic blanket and a willingness to learn in an unconventional classroom. And I bring the food prepared with laughter and love!”

The first session, in January, was fun…but uh, a little interesting. 

Set in the picturesque Arbor area of Presidio Park, birds singing, weather is perfect, and I have all sorts of beautiful organic produce from Napoli Farms. As a traveling chef I have to be open to crazy last minute changes to the original plan. Some of the laughter and love, must be applied to situation when things don’t quite work out as planned.  That time it was having my camp stove die right in the middle of cooking the very first dish.  Yep, we had plenty of fuel, but the stove decided it was done and retiring; even though it was fully functioning the night before.

How was I supposed to do a cooking demonstration with no stove to cook on??  Lucky thing was some friends of mine were class participants, and they only lived a few minutes away in Mission Hills. They offered up their kitchen and dining room for us to hold the class. Talk about a literal, “pop-up” cooking school.

10849889_761328343932242_1761016212719349402_n

So we all packed and gathered the food and pots and pans, etc…caravaned over to their place. Someone stopped to pick up a couple bottles of wine and sparkling water. And so flexibility and open mindedness ensured we had a great class, with plenty of tasting and learning; oh and yes lots of laughter and love!

Ah…  The second session, in February was fantastic.  I held it in the same original location of Presidio Park, but this time had two working camp stoves, thank you very much!! We were once again, blessed with perfect weather. There was a great group of enthusiastic and fun food lovers that chowed down on a menu of healthy, fresh dishes of my own creation.

Including: Spicy Shrimp with Roasted Pepper Kalamata Relish and Feta Sauce, Asparagus and Arugula Salad with Parmesan Citrus Dressing, Smoky Tomato and Fennel Soup with Crispy Garlic and Thai Basil, Seared Local Halibut with Super Greens White Bean Ragout and Walnut Gremolata.

This month’s recipe I am sharing with you is for that oh so delicious Spicy Shrimp with Roasted Pepper Kalamata Relish and Feta Sauce.  It is served on pieces of red cabbage in the picture.  However, you can serve it on a fried plantain, a tortilla chip, a grilled piece of bread or on top of a bed of greens as a composed salad. I was thinking these would make a kick ass shrimp taco, too.  I purchased some huge baja white shrimp from Catalina Offshore, and they were just gorgeous and juicy and tender.

So that is the tale of the two sessions of Pop Up Cooking School so far, and I’m planning on having one every month! You can sign up by going to my “events” page on the website, and clicking on the link to purchase tickets.

Spicy Shrimp with Roasted Pepper Kalamata Olive Relish and Feta Sauce
Write a review
Print
Ingredients
  1. 1 head of red cabbage
  2. 1 pound 21/25 shrimp, peeled and deveined
  3. 4 cloves garlic, minced to a paste
  4. 1 tsp. kosher salt
  5. ½ tsp. each cayenne pepper, pasilla chili powder and crushed red pepper flakes
  6. Drizzle of olive oil
  7. 1 TB coconut oil
  8. ½ c. minced onion
  9. 2 TB minced fresh oregano
Ingredients for Relish
  1. 1 roma tomato, brunoised
  2. ½ c. pitted Kalamata olives, chopped
  3. 1 red bell pepper
  4. Juice from ½ a lemon
  5. 1 TB extra virgin olive oil
  6. ½ c. brunoised celery
  7. 1 scallion, thinly sliced
Ingredients for Feta Sauce
  1. 1 clove garlic, minced to a paste
  2. 2 TB extra virgin olive oil
  3. ½ crumbled feta
  4. 2 TB lemon juice
  5. 1 c. plain Greek yogurt
  6. Pinch of salt and pepper
Instructions
  1. Remove the tales from the shrimp. Using a pairing knife, cut a slit up the back the almost goes all the way through. This gives the shrimp and extreme butterfly cut, which makes it absorb more of any flavor we are trying to impart. Toss the shrimp with the olive oil, garlic, onion, oregano and dry spices.
  2. Heat a very large skillet with coconut oil. Using tongs or a gloved hand, place the shrimp cut side down and sprinkle with salt. Allow it to cook for a minute, before flipping the shrimp to its sides to cook just until it is opaque.
  3. For sauce: Mash the feta with the garlic and olive oil until it is quite smooth. Then stir in lemon and yogurt, and a pinch of salt and pepper. For relish: Either on a grill or over an open flame on your stove top, fire roast the bell pepper until the skin is mostly black. Place it in a bag or a closeable container and let it sweat for at least five minutes. Using a spoon and a pile of paper towels, scrape the skin off. Discard the blackened bits and paper towels. Julienne and then finely dice. Toss with remaining ingredients.
  4. To serve: Cut cabbage in half, then cut each half in fourths, creating wedges. Peel layers of cabbage wedges, which will now make a little “cabbage chip”. Start with a dollop of sauce, a shrimp then a sprinkle of relish.
The Flavor Conspiracy http://flavorconspiracy.com/